Katelyn Tan | A Singapore Beauty, Travel and Lifestyle Blogger
Showing posts with label nails. Show all posts

Tsum Tsum Nailart by Highness Palace on Vanitee

Sunday, 15 January 2017


Had my nails done by Highness Palace on Vanitee! I've been on quite a tsum tsum craze lately and wanted tsum tsum nails to be done despite having rather small nails. The gelish nail art lasted me for a good 1.5months, I could have kept them for 2 months if I weren't that bothered by my super long nails!

Pastel Teddy Nails at GeNails

Friday, 9 January 2015

Had my nails done at GeNails! GeNails was founded by Jeanne in September 2013. They are a home-based salon in Lavender (5mins walk from the MRT Station) and they do House Call (go to your place to do your nails) too. Prices are affordable and you can hire them for events such as Hen's Night, Bridemaids gathering and BFFs sleepover at customised package price! :)

Some of the samples that Jeanne did :) Photo on top are some designs for kids! So yes your little princess can have their nails done too!

Beauty Destination by L’Oreal Paris - Les Petite Dresses for your nails

Tuesday, 1 October 2013

Here's post #2 for Beauty Destination! :)
For those who don't know, Beauty Destination is a new and exciting website by L’OrĂ©al Paris!
It is a one stop site for makeup tips and tricks!
You can read post #1 and learn how to UPsize your Eyes here!
P.S I will be sharing my makeup and beauty secrets on that website too ;)

This month, you’ll learn all about how you can Dress up your own nails to match different outfits!
The beauty topic of the month-Les Petite Dresses for your nails!

So I attended the second L’Oreal workshop which was all about nails :)
At this workshop we had a chance to learn from The School of Make-Up!

The nail polishes above are all from L’Oreal Paris Color Riche Nail Vernis series.
Here are some of its advantages:

1. A total of 30 shades!
Which is why the title above is Les Petite Dresses for your nails.
One shade per day and you can dress up your nails to match different outfit :)

2. Built-in top coat with 10 days of wear!
So you won't have to worry about waiting for your nails to dry,
apply top coat and wait for it to dry again.

3. unique patented brush!
It is a flat rounded brush for easy application and a stem specially designed
for the product to adhere to the centre of the brush to deliver just the right dose of product.
Each stroke applies a smooth and even layer all over the nail!


All the hardworking ambassadors at work ;)

A demo being done on Jessica's nail :)
You can find tutorials for these two nail art designs here :)

Yingjie and my nail polish combined :)

A simple 3 step nail art I did at the event venue :)
The nail polishes were super easy to use!
Normally I will dirty mess up my fingers by painting out of the nails.
But with their special brush, I didn't paint out of the nails at all!
(at least for the base coat)

A photo with Eileen and Yingjie :)

Now are you ready for another nail look that I
did using Color Riche Nail Polish?


Want a tutorial for this nail look?
Leave a comment below! :)

What’s more, participate in the Color Riche Le Vernis Contest
and stand to win Personal Advanced Make-up & Grooming course
by The School of Makeup worth $500.
1 Lucky voter will win a Personal Make-up course worth $280!
Submission ends 11th October and voting ends 15th October.
Hurry and join now ;)

Color Riche Nail Polish is available at $8.90 exclusive to Watsons only.

Hope you enjoyed the short 3 step tutorial!
P.S Photo filtered hahahas.
Good luck :)

[Review] NCLA Santa Monica Shore Thing

Tuesday, 16 July 2013

Here to share a nail polish brand with all of you today!

It's NCLA, a Los Angeles Nail Lacquer and Nail Wraps brand!

Beauty. Fashion. California.
NCLA creates luxury nail products by effortlessly combining the love for everything fashion and beauty. The results are exceptional visuals and superlative products they unconditionally believe in.

NAIL LACQUER
The complete line of luxury nail lacquers is a ‘5 Free’ range of haute couture for your nails. NCLA proudly makes all their products without any harmful toxins and do not test on animals. Ever. The formula is California styled and 5 Free guaranteed!

 All nail lacquer collections are entirely unique, high-fashion head turners.
 All our colors are ‘5 Free’ (no toxins such as DBP, Toluene, Formaldehyde, Camphor and not tested on animals.)
 The luxurious NCLA formula is high shine, quick dry and chip resistant.
 The Dupont flat brush allows for an easy, perfectly smooth application.
 Combined with Gloss It Base and Flawless Top Coat, it delivers a chip-free manicure.
 The color range is a constant evolution, expansion, revolution. NCLA sets the trend!

NAIL WRAPS
The patent pending nail wrap designs are runway inspired, very easy to apply and extremely long lasting. As an added bonus they actually help to protect your nail beds. And all you need to apply is clear coat. Done.

 Ultra thin and extremely long lasting.
 Very easy to apply, without any heat source.
 Runway inspired designs that dress up any look.
 Superior quality and patent pending technology.

Live NCLA. Every day.
(above from NatureLova)

The reason why I love this brand?
Cause they remind me of USA!
1. Products are made in USA
2. Designed and crafted in South California
3. The names are related to LA

Every single bit of the nail lacquer reminds me of USA! I miss Los Angeles so much!
I really wish I can go back there again! Any travel sponsorships? Lols.

Anyways back to the nail polishes =P

If you are looking for NCLA nail polishes, I would recommend you go to NatureLova
because... they have the lastest collection (June 2013 collection) there!
Here is a 10% discount off NCLA products for all of you :) 
Just key in "NCLA10" upon check out ;)

♥♥♥

Time for a NCLA Nail Lacquer review?

The shade I picked was Santa Monica Shore Thing
I picked this because it reminds me of LA,
we went to Santa Monica for a couple of times when we were in LA!
And also because I love this shade!
P.S It's one of NLCA's best selling shade!

The color is not really mint green (photo of the bottle above), sadly.
It's similar to the background splash color in the photo above!
I was looking for a mint green color!
Nonetheless, when taken under strong lightings, it does look closer to mint green color.
And also it appears mint green/tiffany blue in photos. No idea why.

A very unique light green color.
Sort of reminds me of seaweed ;)

A normal brush, slightly more than 1/3 the size of a nail.

Color is more true to this photo.
Here's how it looks like with one coat (left) and two coats (right) on.
The nail polish is really thick and smooth.
It goes on really easily and dries quite quickly :)
Gives a really nice coverage with two coats on.

Conclusion: Will definitely get more of NCLA Nail Polishes!

Totally agree with this! Since I can't go to LA immediately, I shall use their Nail Lacquers!
Btw, they are famous for their pretty Nail Wraps too! Remember to checkout the SG shop here ;)
Get 10% off NCLA products by entering "NCLA10" upon checkout.

[Tutorial] Nail Hearts Using Band-Aids

Monday, 18 March 2013

Things Used

Jacqueline Burchell Calcium Base Code
Essie Nail Lacquer - Fiji
Jacqueline Burchell Nail Lacquer - Behave!
Jacqueline Burchell Top Coat
Band-aids (one for every two nails)
Heart Shape Craft Punch or Sissors

If you would like to know more about the Jacqueline Burchell nail polishes, you can read about it here!

1. Apply your base coat followed by base color.

2. Cut your band-aid into two then using the heart shape craft punch, punch a heart shape on each of them. 
If you do not have a craft punch, you can use a pair of scissors to cut it yourself.

3. Stick the band-aid on your nail.

Note: If you want a full heart without polka dots, 
get a plaster that does not have holes like mine!
Else the final outcome will have dots on it too ;)
But if you love polka dots, you can use it and get neat alignments!

Tip: Ensure that the base nail lacquer has completely dried before sticking the band-aid on.

Tip: Make sure the band-aid is not too sticky.
What you can do is to stick it on your arms and remove them then stick again then remove till it is not overly sticky. Else when you remove it, it will pull out your base nail lacquer!

4. Using your favorite red nail lacquer, paint over the band-aid.
Because I knew I would end up having a few dots over,
so I painted the whole thing to make it look like a polka dot background ;)

5. Quickly remove it.

And it is completed! ♥

Learnt the above method from Michelle Phan. Another one of my favorite beauty youtuber.
Mad love her videos too! All so good quality one!

Looks very easy right?
But let me tell you. The first time I did it, I had to redo cause it it smudged!
If you don't want to end up redoing, read all the tips that I stated above okay ;)

Hope you like this tutorial and hope the tips helped! ♥

[Review] Jacqueline Burchell

Friday, 18 January 2013


I not sure if all of you here heard of this brand before.
They are a Singapore based cosmetics manufacturer that specializes in Nail products and have over 250 Nail Lacquer colours in their catalogue. Note that their speciality is Soak Off Gel Polish, which they have over a 1000 colours for their customers to choose from! Their products are easily found in many Nail Salons around the country. Most importantly, they are one of the safest products on the market as all Jacequeline Burchell products have been tested and verified by the swiss certification firm SGS to be safe from Toluene, Formaldehyde and Dibutyl Phthalate!

Here are some shades I swatched!
They are normal nail lacquers not soak off gel polishes.
I've linked each of the colors to the direct product link so you can take a look there too :)

Initially I thought it was gonna be a simple and plain ivory color.
But to my surprise, it was such a unique and pretty ivory color with a blueish tint in it!

A simple nude color.
Definitely something that will not go wrong for work ;)
Love how smooth looking they are.

A pretty dark/slightly hot pink color. Really pretty.
A little sheer but even after applying 3 layers to get this color, I don't feel that it is too thick!
My second favorite color! :)

Think this is a nude color that is more true to normal nail colors?
It will look like you have really healthy pink nails!
Suitable for working or when you don't want people to know that you have nail polish on ;)
Smooth and easy to apply.

Love the turquoise color and also how they have square glitters instead of normal ones.
But it can be a little hard to apply and it is rather thick and no so smooth.

See so many photos above? Cause it is my favorite color!
The first photo was without top coat.
Look at the last two photos. They look so pretty after I applied top coats!
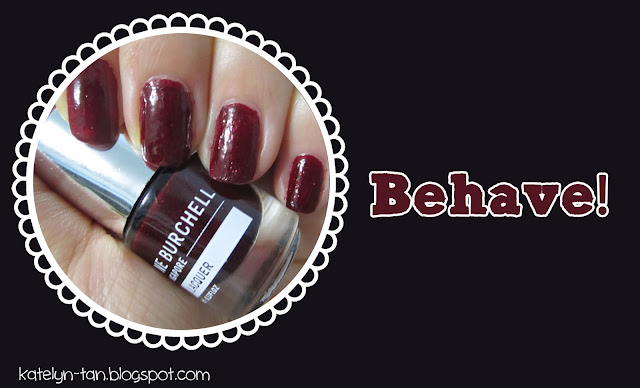
A pretty, slightly oxblood red color!
In a dark room lighting,
you will see that it looks like a very dark oxblood red.
In a brightly lit room
you will see that it looks slightly brighter (still oxblood red) but the red glitters become more obvious.
Under the sun or under strong direct lightings
you will see a bright red nail polish with red glitters.
I love this nail polish color very much! It has been on my nails for a week plus with very little chips.

I don't normally apply cuticle oil.
But this has vitamin E and olive oil in it!
Must be really good for the nails ;)

It's slightly thicker than normal base coats but it has calcium in it!
Very unique right? I've never seen calcium base coats before.

Just like normal top coats.
Couldn't really tell the difference. But good thing is they come in small bottles.
I hate how I am always not able to finish my nail polishes and they end up drying or spoiling!

Here is a photo of No More Excuses.
Looks really dirty right? Cause I helped out with painting of the walls at home!
The white/blue-ish parts are not scratches. They are paints left on my nails.
You realize how there wasn't any chips even after doing all the rough works (painting, climbing, etc)?

Those who knows me well should know that nails polishes cannot stay on my nails for long.
Itchy finger girl here will always somehow scratch and peel them away.
But the nail polish "Behave!" has been on my nails for close to two weeks and I haven't been able to peel them off! They are like stuck to my nails but yet can be easily removed using nail polish removers!
I love how lasting these nail polishes can be! Yay!
Plus I love how smooth their nail polishes are (with exception of tangled in seaweed).
Can't help but keep touching my nails when I had those nail polishes on :)

Remember to check out their shop here!
If you only wish to buy one, I really really highly recommend the color "Behave!"
But why buy one when there are so many pretty colors right?
May all of you have pretty pretty nails! :)

[Tutorial] Galaxy Nails

Saturday, 22 September 2012

As promised on my instagram...

Here is the Galaxy Nails Tutorial! :)

The amount of nail polishes used! :)
from left to right:
O.P.I Base Coat
Elianto Black Nail Polish
O.P.I Alphine Snow
O.P.I Rumple's Wiggin
O.P.I A Good Man-darin is Hard to Find
(which I got from my September Vanity Trove)
O.P.I Play 'Til Midnight
O.P.I Pirouette My Whistle
O.P.I Servin' Up Sparkle
O.P.I Top Coat

Hahas yes I'm O.P.I crazy BUT I'm starting to use other brands of nail polish too okay!

The most important thing - SPONGE!
Just any makeup sponge will do.

Step 1: Apply base coat and paint your nails black!

Step 2: Put some of the white nail polish on the sponge

Step 3: Dap the sponge on different part of your nails for each finger

Step 4: Repeat step 2 and 3 using lilac, orange and dark blue nail polishes
But it still don't look like a galaxy right?

Step 5: Apply glitter to your nails!
I had wanted to use both my glitter nail polish.
But realised that the O.P.I Servin' Up Sparkle was enough.
So I only ended up using one layer ;)

And you are done! But it's really messy right?
Or am I the only messy one? :(
But if you are just like me, no worries!
You can clean this up easily :)

Step 6: Soak a cotton bud in nail polish remover and clean the sides of your nails

Step 7: Apply top coat
And ta-dah! Nicer?

Here's the photo of the nails which I posted on instagram :)

Do comment whether you like this tutorial! 
And you can also suggest any other nail tutorials you would like me to do ;)